If you’re diving into AI image generation with tools like Stable Diffusion, SDXL, or Pony Diffusion, this is the ultimate guide to understanding all the key terms, tools, and settings — especially if you’re working with NSFW or character-focused art.
What’s a checkpoint? Why are people obsessed with LORAs? What’s the difference between SDXL and SD 1.5? And how the hell does CFG scale and Clip Skip actually affect your waifu’s thighs?
Whether you’re generating anime girls, building custom NSFW characters, or just want to understand the tools behind uncensored AI art, this guide breaks it all down. We’ll explain every key term — from fine-tuning and embeddings to Clip Skip and Schedulers — in plain English, no fluff, no gatekeeping.
Oh — and yes, everything here is exactly what powers the uncensored, NSFW-ready models on our own platform. So if you’re reading this to actually make spicy content, you’re in the right place.
Base Models Explained: SD 1.5, SDXL, Pony, and Flux
Before diving into prompts, LORAs, and fine-tunes, it’s important to understand which base model you’re working with — because everything else builds on top of it.
Stable Diffusion 1.5 (SD 1.5)
The original fan-favorite. SD 1.5 is fast, lightweight, and has the biggest ecosystem of NSFW and anime-style checkpoints.
- Runs on lower-end hardware (4–6GB VRAM)
- Thousands of NSFW fine-tunes and LoRAs available
- Slightly more stylized and less realistic than newer models
Stable Diffusion XL (SDXL)
SDXL is the next-gen version of SD. It’s larger, smarter, and creates more realistic, detailed images — but needs better hardware.
- Stronger prompt comprehension
- Better anatomy, lighting, realism
- Requires 12–16GB VRAM or more
Pony Diffusion
Despite the name, Pony is more than just ponies — it’s a stylized, anime-focused model based on SDXL, popular for furry, anthro, and expressive NSFW content.
- Strong character consistency and posing
- Often better at niche styles than base SDXL
- Can be fine-tuned for realism or stylization
Flux
Flux is newest and most powerful of open weights image generation models. It comes in two flavors Flux 1. dev and Flux 1. S. Despite it’s power Flux has 2 issues because of which we can’t recommend it for NSFW image generation.
- Bad licensing – Flux 1. dev has restrictive licensing, so checkpoint makers are kinda turned away from it. Flux 1. S is not good for making checkpoints because it’s a “distilled model”
- Relatively new – New does not always mean good. SDXL and SD1.5 come with literally thousands and thousands of tutorials, checkpoints, loras, doras, finetunes everything.
- Large model – Model is large in size therefore higher end gpu is needed to run it.
TL;DR — Which One Should You Use?
- SD 1.5 for max NSFW compatibility and speed
- SDXL for high-detail realism
- Pony for furry/anthro/anime-style characters
👉 Not sure which model is right for you?
Check out our guide: How to Pick the Best Uncensored AI Model
Checkpoints, Fine-Tunes & Merges and Vae — How You Customize a Base Model
In the last section, we explained base models like SD 1.5, SDXL, Pony, and Flux.
But here’s the thing: base models are just the starting point.
On their own, they’re general-purpose — trained on massive datasets, usually filtered, and often limited in how well they handle NSFW, niche styles, or very specific character prompts.
That’s where checkpoints, fine-tunes, and merges come in.
They’re how the community customizes base models to make them:
- Generate uncensored NSFW content
- Follow specific art styles
- Understand your prompts better
- Focus on character types like waifus, elves, furries, or realistic women
Let’s break down what each of these actually is:
Checkpoint
A checkpoint is the actual model file you load into your generator (like A1111 or ComfyUI). Most of the time, it’s either:
- A base model (like SDXL or SD 1.5)
- A fine-tuned version made by the community (e.g., “Realistic Vision,” “Anything V5,” “Pony Diffusion”)
Think of it like choosing the core personality and skillset of your model.
Fine-Tune
A fine-tune is a checkpoint that’s been retrained on specific data — like explicit NSFW images, anime girls, or a particular style of art.
Why fine-tunes matter:
- They remove safety filters baked into base models
- They make the model more accurate at generating specific content
- They’re how almost all uncensored NSFW models are created
If you want your waifu to look consistently thicc, anatomically correct, and actually match your prompt — you want a good fine-tune.
Merge
A merge is a Frankenstein-style combo of two or more checkpoints. People do this to try to get “the best of all worlds” — like mixing:
- The realism of one model
- The style of another
- The NSFW capabilities of a third
Merges are powerful but unpredictable — quality depends on the skill of whoever blended them.
So… What Should You Use?
- Start with a fine-tuned checkpoint (NSFW-friendly ones are everywhere on CivitAI)
- Try a merge if you’re looking for something more experimental or aesthetic
- Avoid plain base models unless you’re training or layering with LORAs (we’ll cover those next)
👉 Not sure how to pick the right one? We break it down here:
How to Pick the Best Uncensored AI Model
LoRAs, QLoRAs, DORAs & Embeddings — What They Do (and Why LoRA Matters Most Here)
Once you’ve picked your model, you’ll often want to push it further — to get more specific characters, outfits, poses, or body types. That’s where these lightweight tools come in: LoRAs, QLoRAs, DORAs, and embeddings.
They’re all ways to specialize or enhance a model without doing a full retrain, and they can be loaded on top of existing checkpoints in just seconds.
Of these, LoRA is the most important and widely used — especially for NSFW, anime, and character-focused image generation.
LoRA (Low-Rank Adaptation)
A LoRA is a small, powerful file that “tweaks” a model to get better at something specific — like generating:
- A certain character or waifu
- A specific style (e.g. sketch, realistic, shiny latex, VHS look)
- Certain body types, outfits, hairstyles, or NSFW elements
Instead of replacing the model, it nudges the behavior of the one you’re already using.
✅ Why LoRAs are popular:
- They’re fast, lightweight, and stackable
- You can find thousands of LoRAs on CivitAI for everything from elves to mechas to “bigger proportions”
- They can massively improve model output for specific content types
You just load the LoRA and add something like <lora:character_name:0.8> to your prompt — that’s it.
There are loras for everything. For example:
- This lora will help you control persons age
- This lora will help you generate Spider Gwen
- This one will help you generate anime girls adjusting clothes
As you can see, LoRAs are very focused. They help model become good at 1 specific thing.
Here’s a cool part, you can combine multiple Loras together.
For example take adjusting clothes Lora, combine it with Spider Gwen lora and you get Spider Gwen adjusting clothes
Note: Not all Loras work with all other Loras. Some Loras work only with specific checkpoints or base models.
We will have an article on how to use Loras soon, so stay tuned.
QLoRA (Quantized LoRA)
QLoRA isn’t something you use directly during image generation — it’s a technique that lets you train LoRAs more efficiently using low-precision math. Great if you want to make your own LoRA on a consumer GPU, but not essential if you’re just browsing and using existing ones.
DORA (Dynamic LoRA)
DORA is a newer, more experimental version of LoRA. It activates certain layers in real time based on the prompt, allowing for more dynamic style blending and adaptive outputs.
Still mostly used in advanced workflows (like ComfyUI), but growing in popularity for power users.
Textual Inversions / Embeddings
Embeddings (sometimes called textual inversions) teach your model to associate a custom word or token with a very specific look or concept — like:
- A particular face
- A hairstyle
- A color scheme or lighting style
They’re smaller than LoRAs and good for subtle or focused changes, but don’t have as much impact on full-body or stylistic generation.
TL;DR:
- LoRA = Most important of the three; used everywhere to enhance your model for specific characters, styles, or NSFW content.
- QLoRA = A more efficient way to train LoRAs (not needed unless you’re making your own)
- DORA = Advanced dynamic version of LoRA (for power users)
- Embeddings = Tiny style/concept tweaks via keywords
What’s a VAE? (And Why It Matters for Image Quality)
VAE stands for Variational Autoencoder — but all you need to know is this:
The VAE helps finish your image. It adds the final layer of sharpness, color, and contrast. Without the right VAE, your AI art might look blurry, gray, washed out, or just… off.
Even if your prompt and model are great, the wrong VAE can make everything look flat.
Why VAEs Matter (Especially for NSFW or Stylized Art):
- They improve skin tone, lighting, and color — super important for Ai Images
- They can fix weird artifacts like blurry faces or low-contrast shading
- Some VAEs are trained to enhance specific styles like anime, realism, or painting
Do You Need to Load a VAE Manually?
- Many models (especially SDXL ones) have the VAE “baked in” — meaning you don’t need to do anything.
- Other models (especially SD 1.5 fine-tunes and merges) might require a specific VAE file to look right.
Pro tip: On CivitAI, check the model’s description — creators will often recommend a VAE or link it directly. If they say “use vae-ft-mse-840000,” go download that and load it under your VAE settings.
Common VAEs:
vae-ft-mse-840000-ema-pruned– Safe, popular default for SD 1.5- Custom VAEs – Some models (e.g. Anything V5, AbyssOrangeMix, Pony) come with their own
- SDXL Models – Usually have VAE built-in, no need to load separately
TL;DR:
- If your images look dull or gray → it’s probably the VAE
- Some models need a specific VAE, others have one built in
- Always check the model page on CivitAI before generating
- Check out this article where we diagnose most common image generation issues.
Interfaces: AUTOMATIC1111, WebUI Forge & ComfyUI — Which One Should You Use?
Once you’ve picked a model and added some LoRAs, you need a UI (user interface) to actually generate images. There are three main frontends used in the Stable Diffusion world:
- AUTOMATIC1111 (aka A1111)
- WebUI Forge
- ComfyUI
All of them run locally on your machine and let you input prompts, tweak settings, load models, and render images — but they each have their own strengths.
AUTOMATIC1111 (A1111)

This is the most popular, classic interface for Stable Diffusion. If you’ve seen screenshots with prompt boxes, sliders, “txt2img” buttons, and massive extension tabs — this is it.
- Super easy to install and use
- Massive plugin ecosystem (NSFW tools, LoRA managers, upscale tools, etc.)
- Great for prompt experimentation, beginners, and NSFW generation
- Clean UI with side-by-side previews
Most NSFW users start here. It’s the default for a reason
You can get A1111 here.
WebUI Forge
Forge is a modern, faster fork of AUTOMATIC1111. It keeps the same layout and plugin support, but:
- Loads models faster
- Uses GPU more efficiently (especially with SDXL)
- Is better optimized for newer hardware and big workflows
Everything that works in A1111 works here — it just runs smoother. If you love A1111 but want better performance (or fewer bugs with SDXL/LoRAs), Forge is a great upgrade.
You can get WebUI forge here.
ComfyUI

ComfyUI is a node-based interface that gives you full control over every step of the generation pipeline. It looks more like a game dev tool than a prompt box.
- Lets you build complex workflows visually (load model → load LoRA → clip skip → sampler → output)
- More powerful and flexible than A1111 — but harder to learn
- Better for advanced users, automation, or chaining steps (like text → image → image variations)
- Some LoRAs and tools are Comfy-only now
If you want to build multi-stage setups, generate in batches, or make reusable workflows — Comfy is incredibly powerful. But for casual users? It’s overkill at first.
You can get ComfyUI here
TL;DR — Which One Should You Use?
- Just starting out / focused on NSFW prompts? → Start with AUTOMATIC1111
- Want speed + better SDXL performance? → Go with WebUI Forge
- Want full control or building complex setups? → Use ComfyUI
You’ve Got the Tools — Now Let’s Start Generating
Alright, you’ve made it this far:
✅ Picked your checkpoint
✅ Loaded the right VAE
✅ Added some powerful LoRAs (maybe even an embedding or two)
Now it’s time to actually generate some images.
But before you hit that “Generate” button, there are still a few settings that can seriously affect your results — like CFG Scale, Sampler/Scheduler, and Clip Skip.
These don’t sound exciting… but they make a huge difference in quality, consistency, and style — especially for NSFW content.
Let’s break them down one by one so you know exactly what to tweak (and what to leave alone).
The Positive & Negative Prompt — The Core of Every Image
No matter which model or tool you’re using, everything starts with the prompt.
But what a lot of new users don’t realize is that there are actually two prompts:
🟢 Positive Prompt and 🔴 Negative Prompt
…and learning how to balance them is the fastest way to go from “meh” to “holy sh*t.”
Positive Prompt
This is what you do want in your image — the description of the subject, style, mood, setting, and vibe. The more specific, the better.
Example:
“blonde anime girl, red eyes, leather outfit, standing in a neon-lit alley, cinematic lighting, extremely detailed, high resolution”
Tips:
- Start broad, then add details (clothing, mood, pose, camera angle)
- Use commas to separate concepts
- The order matters a little — weightier concepts should come earlier
- You can use LoRA trigger tokens in this prompt too (e.g.
<lora:military_armor:0.7>)
Negative Prompt
This is what you don’t want in the image — like broken hands, bad anatomy, weird eyes, extra limbs, or unwanted styles.
Example:
“blurry, low quality, extra fingers, mutated hands, poorly drawn face, watermark, ugly”
Tips:
- Use a solid default negative prompt (you’ll find tons on CivitAI)
- Add more as you notice consistent problems
- Don’t go overboard — too many negatives can restrict creativity
Bonus tip for NSFW creators:
If you’re working with spicy content, a good negative prompt can help avoid broken anatomy, weird faces, or censored outputs.
Example
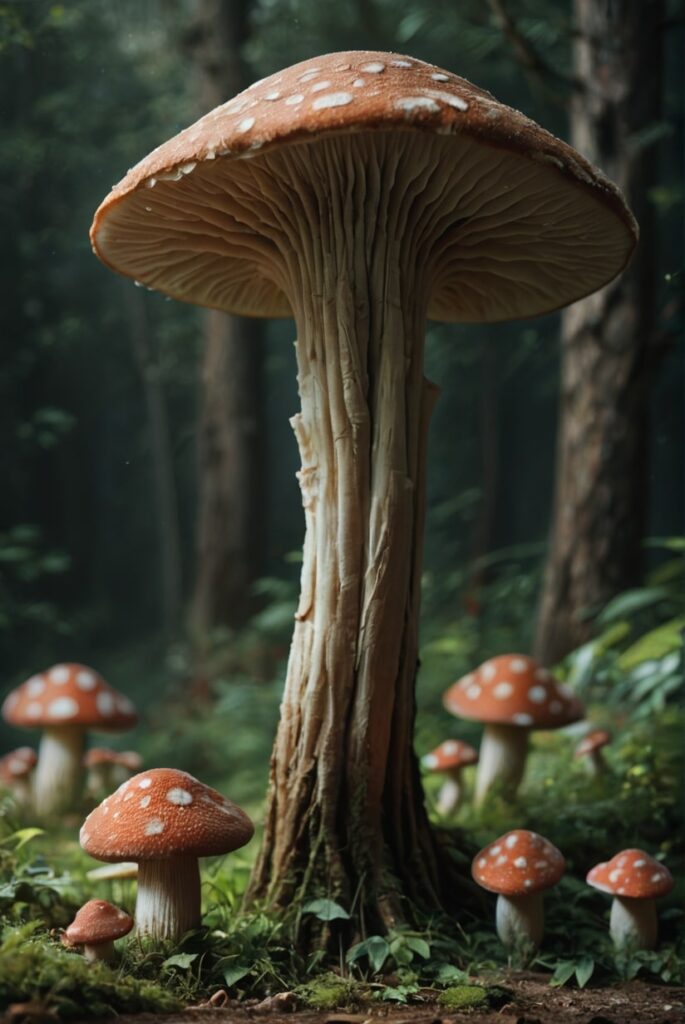
First image:
Positive prompt: “scenary, mushroom“
Negative prompt: empty
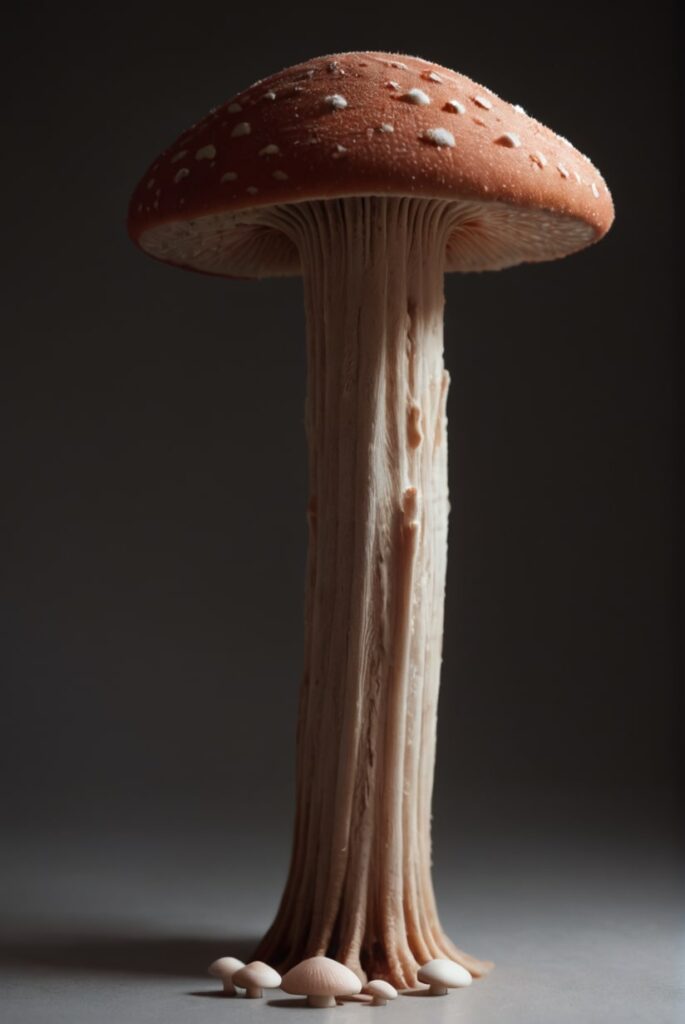
Second image:
Positive prompt: “scenary, mushroom“
Negative prompt: “grass”
TL;DR:
- Positive prompt = what you want
- Negative prompt = what you don’t
- Together, they define how your image looks — way more than most settings do
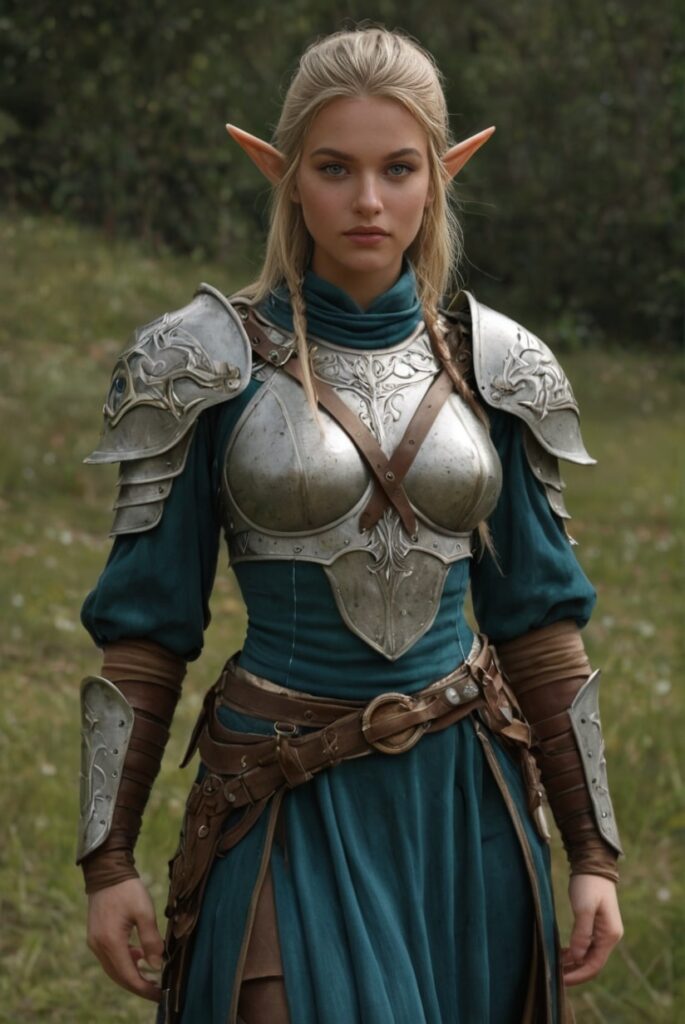
How to Write a Good Prompt (and Why Detail Matters)
Prompting in Stable Diffusion isn’t about writing pretty sentences — it’s about feeding the model precise visual instructions. The model doesn’t understand your intent like a chatbot does — it only reacts to the keywords you give it.
Bad Prompt: Natural Language + Too Vague
“I want a beautiful elf warrior.”
This sounds fine to a human, but the model doesn’t really “get” what you’re asking for. What kind of elf warrior? Man or woman? Standing where? What’s the pose? What lighting, outfit, mood?
You’ll probably get something generic, flat, or inconsistent.
Better Prompt: Tag-Based, But Still Too Minimal
“elf warrior, forest, confident expression”
Okay — this is in tag format, which is a great start. But it’s missing all the detail that helps guide the model’s aesthetic and mood. You’ll likely get a basic image with no real polish or personality.
Best Prompt: Tag Format + Rich Visual Detail
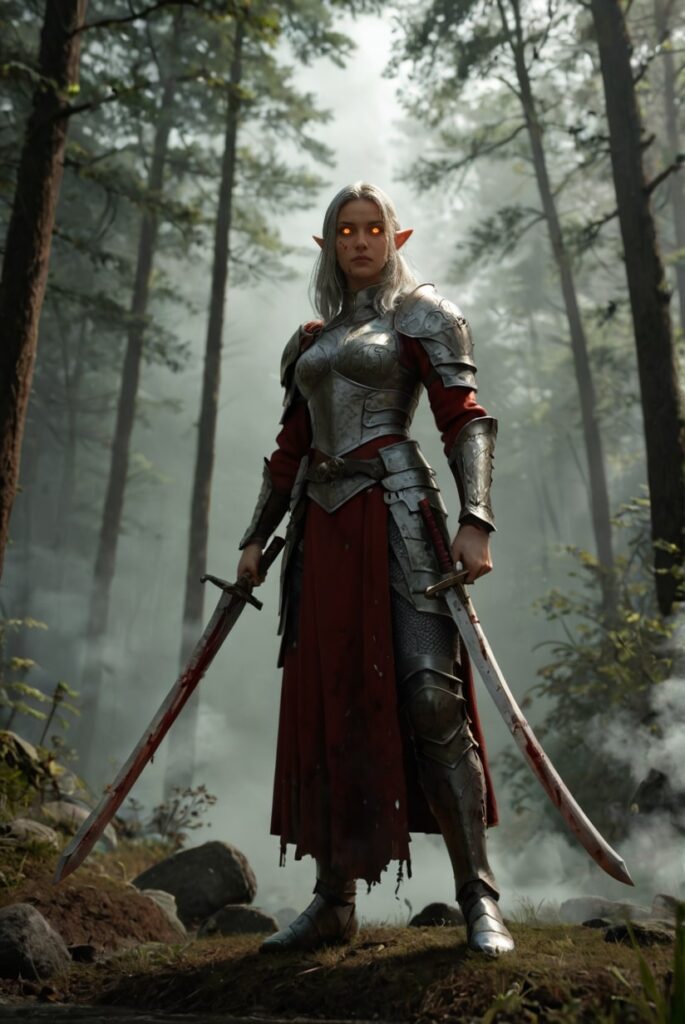
“elf warrior, fantasy armor, confident expression, standing in a forest, cinematic lighting, volumetric fog, glowing eyes, flowing silver hair, holding sword, full body, high detail, masterpiece, 4k”
This version gives the model:
- Subject: Elf warrior
- Scene: Forest
- Pose: Standing, holding sword
- Mood: cinematic lighting, volumetric fog
- Style cues: High detail, 4k, masterpiece
- Facial/body details: glowing eyes, flowing silver hair
- Camera angle: full body
The more visual traits you add, the better the model understands what you want.
📌 Prompting Tips:
- Start broad, then layer in specifics
- Be visual, not verbal — don’t explain, describe
- Think in tags, like you’re labeling an image
- Add details for pose, lighting, expression, outfit, background
Let’s analyze
A simple prompt like “beautiful elf warrior” can absolutely produce a decent image — but that’s mostly thanks to the model’s built-in training, not your prompt. Models like SDXL and Pony Diffusion have seen thousands of elf warriors during training, so even a vague description can give you something that looks good on the surface.
But here’s the catch:
The result will almost always be generic — a default elf girl with no real personality, no unique details, and no story behind her.
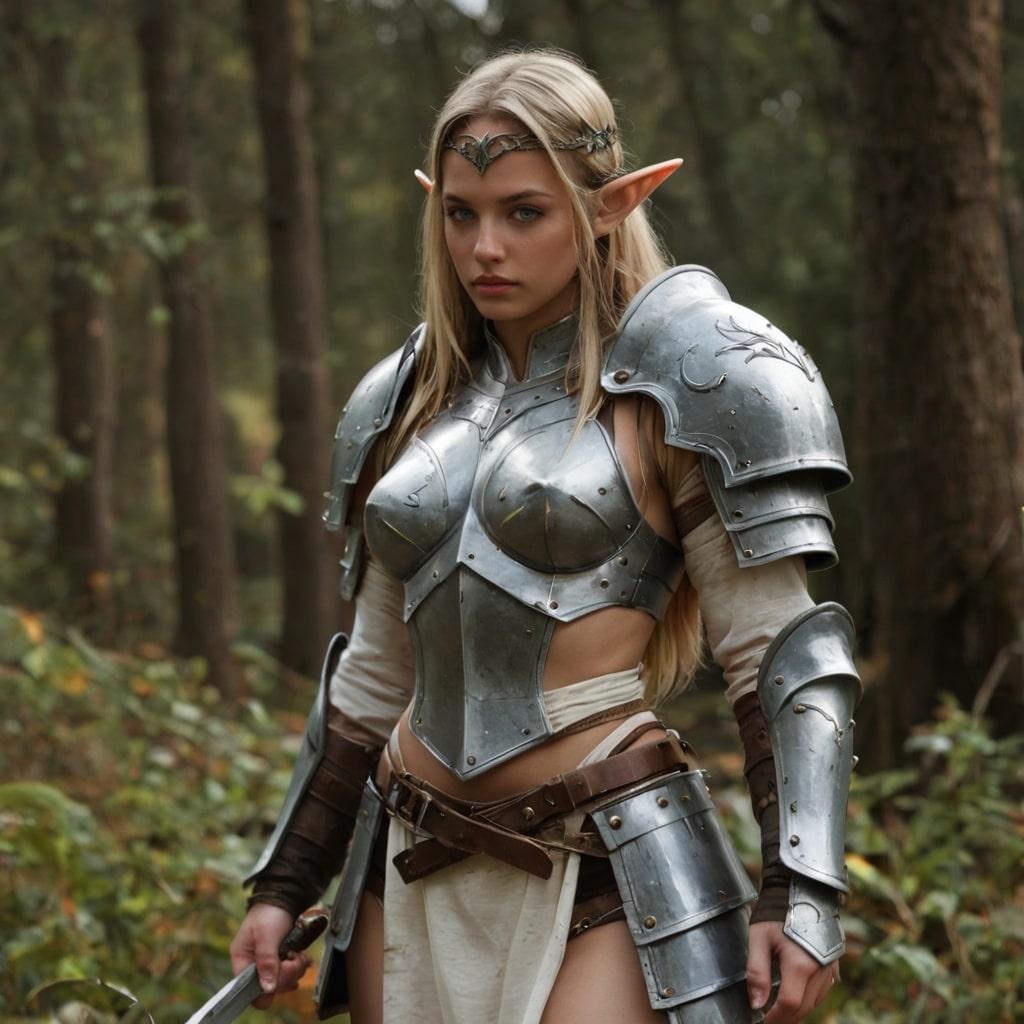
Now compare that to a detailed prompt like:
“elf warrior, silver armor, forest, fog, flowing white hair, glowing eyes, holding a bloodstained sword, confident expression, cinematic lighting, fantasy background, full body, masterpiece, 4k”
Suddenly, you’re not just generating a face — you’re building a scene.
You’re telling the model:
- What kind of elf she is
- Where she is
- What she’s wearing
- What she’s doing
- And how she should feel
It transforms the output from “yet another elf” into a character with a vibe — someone who could exist in a game, a story, or your next roleplay.
The more detail you give, the more the model fills in the world around her — and the more you control the outcome.
What Are Danbooru Tags (And Why AI Models Love Them)
If you’ve seen prompts like “1girl, blush, open mouth, thighhighs, looking at viewer” and thought,
“Why does this sound like someone just listed keywords?” — you’re absolutely right.
These are Danbooru-style tags, and they’re the secret sauce behind most anime and NSFW AI image generation.
What Is Danbooru?
Danbooru is a massive anime imageboard that uses a detailed tag system to label every part of an image:
- Characters:
1girl,2boys - Expressions:
blush,open mouth,smile - Outfits:
maid outfit,lingerie,school uniform - Camera angles:
from behind,close-up,low angle - Body features:
long hair,large breasts,thick thighs - Style cues:
masterpiece,dramatic lighting,nsfw
Most anime-style Stable Diffusion models — like Anything V5, Pony Diffusion, and many NSFW fine-tunes — were trained on images labeled with Danbooru tags. The model thinks in tags, not full sentences.
Why They Matter
- You get way more accurate generations using Danbooru-style tags
- Tags help the model focus on visual traits — not guesswork
- Most community prompts on CivitAI follow this format — because it works
Example:
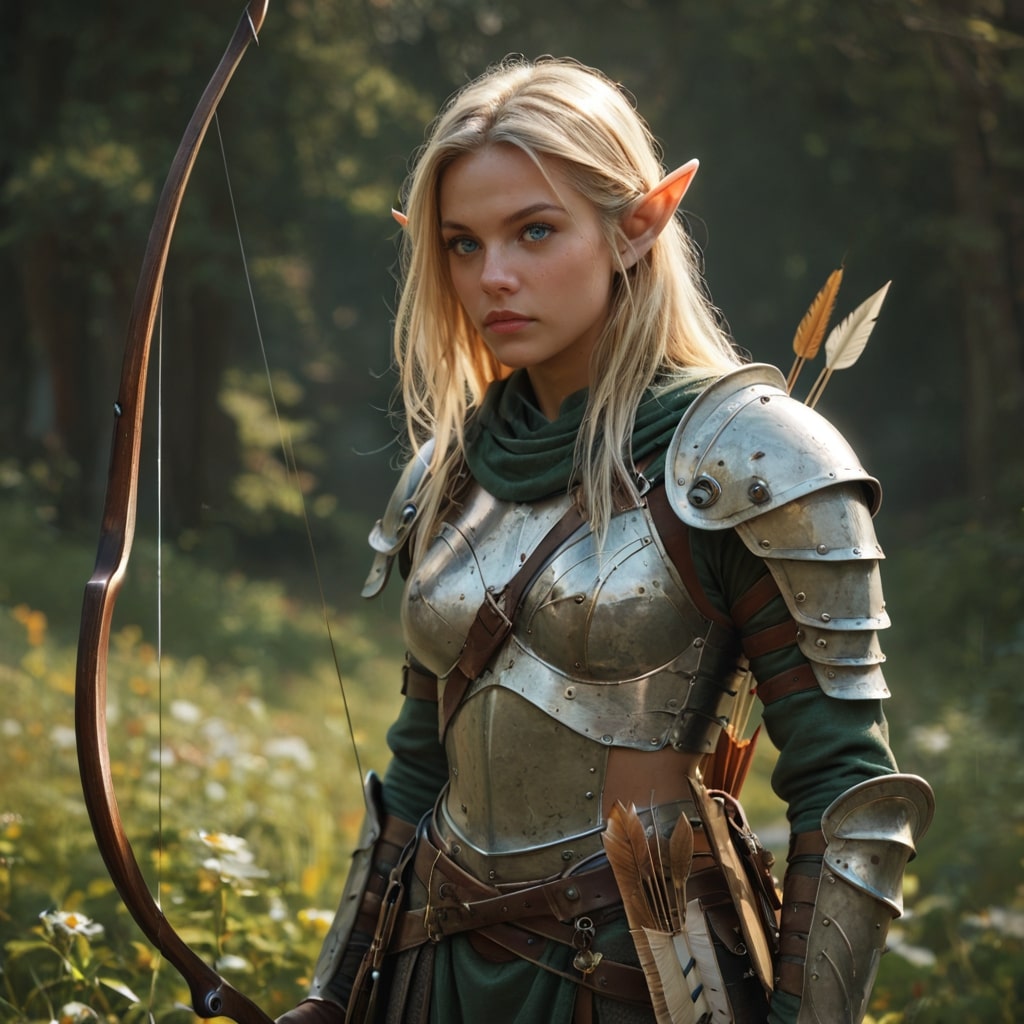
✅ Good Danbooru-style Prompt:
“1girl, woman, elf, blue eyes, blonde hair, armor, archer, bow, arrow”
❌ Too Natural-Language Prompt:
“an elf warrior girl in sexy armor with bow in her hand”
Notice that with Natural-Language Prompt Stable diffusion ignored “with bow in her hand“ and gave her a sword. As your prompt gets more complicated model will ignore more and more details unless you use tags.
Want to Learn the Tags?
Browse and search thousands of official tags here:
🔗 danbooru.donmai.us/tags
Keyword Emphasis — How to Tell the AI What Really Matters
That’s where keyword emphasis comes in.
By adjusting emphasis, you’re basically telling the model:
🗣️ “Pay more attention to this part.”
or
🫥 “This detail isn’t so important.”
When generating images with Stable Diffusion, sometimes just listing keywords isn’t enough.
What if you want the model to really focus on something — like a facial expression, outfit, or body type?
How to Emphasize or De-emphasize Keywords
Use parentheses () and a value to control importance.
Examples:
1girl, (red eyes:1.4), (smile), (background:0.4)
red eyesis strongly emphasizedsmilehas mild emphasis (default is ~1.1)backgroundis deemphasized so it won’t steal focus
Best Practices:
- Keep values between 0.1 and 1.5
- Going above 1.5 can cause weird faces, warped features, or “overcooked” effects
- You can also use nested parentheses like
((thick thighs))for shorthand emphasis
Examples:
Prompt: woman, brown eyes, smile, white top, background
We will now play with emphasis for keyword “smile”, while not changing anything else in prompt.
Sampler Type, Sampling Method & Steps — How Your Image Actually Gets Built

After you’ve written your prompt and picked your model, the AI still needs to generate the image step by step from noise — and that process is controlled by samplers and steps.
These settings can dramatically change the style, detail, and quality of your final image.
If something looks off — blurry, flat, or too soft — the problem might be here.
Sampler Type (aka Sampling Method)
The sampler is the algorithm that decides how the image is refined.
Each one behaves a little differently — some are faster, some more detailed, some more stable.
Popular samplers:
- Euler a – Very fast, good for anime/stylized art, but less detail at high resolution
- DPM++ 2M Karras – Smooth, sharp, great for SDXL and realistic faces
- DPM++ SDE Karras – High-quality, works well with fine-tunes and SDXL merges
- DDIM – Quick and old-school, okay for stylized work
💡 Pro Tip:
Most models come with recommended samplers and step counts — especially on CivitAI.
Always check the model page to see what works best.


Lets analyze
Notice how image generated with DPM++SDE Karras is much more detailed. So, you might be asking, why shouldn’t I always go with this sampler?
Here’s the thing:
- Euler A image took 4.6 seconds to generate on our machine. DPM++SDE Image took 8.7 seconds, so it was almost two times slower
- Not all checkpoints work with all samplers. Always check checkpoint description for recommended settings.
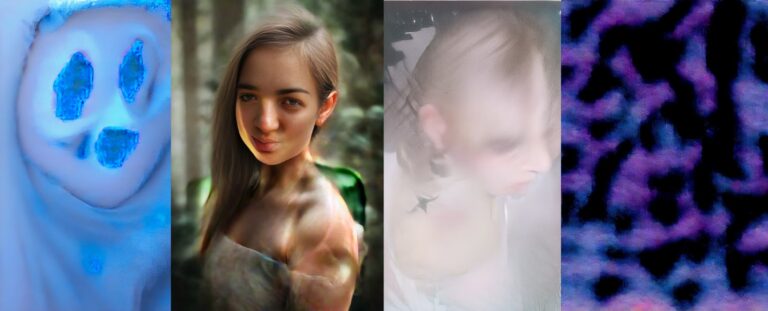
This is what happens if you use samplers that are not recommended for the model, or if you give sampler not enough steps to work with. Check out this article where we diagnose more Ai Image generation issues
Sampling Steps
This controls how many times the AI refines the image.
More steps = more detail… up to a point.
General guide:
- 20–30 steps → Fast, decent quality (great for testing)
- 30–40 steps → Ideal for most high-quality generations
- 50+ steps → Sometimes better, but not always worth it — diminishing returns
Note: Picking more steps does not only control amount of details, more steps Ai has less chance of it making errors(Extra limbs, missing fingers, weird face, etc)
⚠️ Some samplers (like Euler a) work best with fewer steps (20–28).
Others (like DPM++ 2M) need 30–40 to get the full benefit.
DPM++ SDE Karras with different steps:
Euler A with different steps:
Why This Matters:
- Using the wrong sampler or too few steps can make your image look unfinished or blurry
- Using too many steps (especially with fast samplers) can actually hurt quality
- Matching the right sampler + step count to your model = best results
TL;DR:
- Sampler = the AI’s drawing style (some fast, some detailed)
- Steps = how long it refines the image
- Most models will recommend what to use — follow it!
- Euler a is fast but less detailed; DPM++ SDE Karras is slower but sharper
- 20–40 steps is the sweet spot for most models
Image Size Matters — Best Resolutions for SD 1.5, SDXL, and Pony

Not all AI models were trained at the same resolution — and using the wrong size can seriously affect quality.
This includes:
- Blurry details
- Bad anatomy
- Distorted faces or stretched proportions
Here’s a quick breakdown of the recommended image sizes for each model family — and why they matter:
Stable Diffusion 1.5 (SD 1.5)
SD 1.5 was trained on 512x512px images, so it performs best near that resolution.
Best sizes:
512x512– Balanced square512x768– Great for vertical portraits768x512– Good for wide scenes or group shots
📌 Going much higher without proper upscaling can reduce sharpness and cause detail loss.
Stable Diffusion XL (SDXL)
SDXL was trained on 1024x1024px images, and it expects high-resolution input/output.
Best sizes:
1024x1024– Optimal for detailed characters and scenes824x1232– Vertical compositions (great for NSFW portraits)1232x824– Landscape scenes or action shots
⚠️ Important:
Using lower resolutions (like 512×512 or 768×768) with SDXL will result in lower quality, softer detail, and more rendering artifacts. Always generate close to 1024px for best results. Check out this article where we diagnose more Ai Image generation issues
Pony Diffusion (SDXL-based)
Pony is based on SDXL, so it follows the same image size rules.
Best sizes:
1024x1024– Clean, centered portraits824x1232– Full-body, vertical shots1232x824– Dynamic widescreens or duo characters
🧠 Just like SDXL, don’t downscale Pony. Lower res = lower fidelity.
TL;DR:
| Model | Best Resolutions | Avoid This |
|---|---|---|
| SD 1.5 | 512×512, 512×768, 768×512 | Anything above 768px |
| SDXL / Pony | 1024×1024, 824×1232, 1232×824 | Anything under 1024px |
⚙️ Using the right resolution ensures your character looks sharp, clean, and well-composed — especially in NSFW scenes where detail matters.
What Is Hires. fix? (And When Should You Use It)

If you’re working with SD 1.5, you’ve probably noticed that anything above 512x512 starts to look soft, distorted, or just… wrong.
That’s because SD 1.5 was trained on small images — but we all want big, high-res, detailed art.
Enter: Hires.fix.
What Does Hires. fix Do?
Hires.fix is a two-stage generation process:
- First, the model generates your image at a small, stable size (usually 512×512 or 512×768).
- Then, it upscales the image (e.g. to 1024×1536) and does a second render pass to add new detail, not just stretch pixels.
It’s like upscaling — but smart.
When to Use Hires.fix:
- Any time you want larger images with SD 1.5
- When generating full-body characters, scenes, or posters
- To add sharpness, muscle definition, or outfit detail in NSFW art
📌 Don’t use it for SDXL or Pony — they already support high-res natively (1024×1024+), so Hires.fix isn’t needed.
Key Settings (If You’re Using A1111 or ComfyUI):
- Initial size: Start with 512×512, 512×768, or 768×512
- Upscale to: 1024×1536, 1024×1024, etc.
- Upscaler: Latent (fast), Latent Antialiased, or 4x_NMKD (very sharp)
- Denoising strength: 0.3–0.6 is ideal
- Low = subtle touch-up
- High = more creative changes
TL;DR:
- Hires.fix = smart upscale for SD 1.5
- Great for making large, sharp, detailed NSFW art
- Not needed for SDXL or Pony — they’re high-res by default
CFG Scale & Clip Skip — The Hidden Settings That Can Make or Break Your Image
Once your prompt is ready and your model is set up, there are two final settings that can seriously affect your results — even if you don’t touch anything else:
- CFG Scale
- Clip Skip
They sound technical, but once you understand how they work, you’ll unlock way more control over how your images look — especially for NSFW, stylized, or prompt-heavy generations.
CFG Scale (Classifier-Free Guidance Scale)
CFG Scale tells the model how closely it should follow your prompt.
- Low CFG = more creative, loose results
- High CFG = more literal, obedient results
General Recommendations:
- 5–7 = Looser, more “artsy” generations (sometimes ignores details)
- 7–9 = Balanced range for most models
- 10–12 = Sticks tightly to your prompt, but may cause weird artifacts or overexposed images
⚠️ Going too high (like 12+) can overcook the image — blowing out colors, breaking anatomy, or making it look unnatural. Check out this article where we diagnose more Ai Image generation issues
🧠 Most good models (especially NSFW ones) perform best in the 5–9 range.
Clip Skip
Clip Skip changes how many layers of the CLIP text encoder are used when interpreting your prompt.
- Clip Skip 1 (default) = normal prompt processing
- Clip Skip 2 = ignores the last layer, which can lead to better prompt matching, stronger colors, and more expressive results
Clip Skip is subtle, but many anime, stylized, and NSFW models (like Anything V5, Pony, AOM3) were trained with Clip Skip 2 — and will look wrong or dull without it.
📌 You’ll often see “Use Clip Skip 2” mentioned on model pages. Always follow it if it’s recommended.
TL;DR:
- CFG Scale = how closely the model obeys your prompt
→ Stick to 6–9 for most models - Clip Skip = tweaks how your prompt is interpreted
→ Use 2 if your model recommends it (especially anime/NSFW)
Optional Plugins: ADetailer & ControlNet — Level Up Your Results
Once you’ve got the basics down — prompt, model, LoRAs, VAE, samplers — you might start running into the usual frustrations:
- Faces that look slightly off
- Hands that just won’t behave
- Poses that don’t match what you wanted
- Weird distortions in long bodies or custom outfits
That’s where optional tools like ADetailer and ControlNet come in. They’re not required, but they can massively improve quality, control, and consistency — especially for NSFW, portraits, and complex scenes.
ADetailer (Automatic Face Fixer)
ADetailer stands for “Auto Detailing” — and it’s exactly that.
It automatically scans the image (usually faces), and re-renders them with extra care using a second pass. It’s great for fixing:
- Blurry or off-looking faces
- Eyes that aren’t aligned
- Odd expressions
- Low-detail close-ups
🧠 It’s especially useful when generating close-up NSFW art, where facial detail matters.
You can also use it to:
- Fix hands (if configured)
- Apply different LoRAs just to the face
- Tweak expressions or styles selectively
🔧 You just enable ADetailer and it does the magic automatically — no extra setup needed once installed.
ControlNet (For Total Pose & Layout Control)
ControlNet is like grabbing the AI by the shoulders and saying:
🗣️ “Draw it exactly like this.”
It lets you feed in pose sketches, depth maps, canny edges, or reference images — and the model will build your image to match it.
Use ControlNet to:
- Match a specific pose (especially for NSFW pinups)
- Trace over a photo or sketch
- Keep proportions consistent across multiple images
- Recreate scenes with alternate outfits or expressions
🧠 For NSFW creators, ControlNet is a game-changer — it helps you nail poses without relying on luck or prompt tuning.
Some popular ControlNet types:
- OpenPose – For exact human body poses
- Canny / Scribble – For line art or basic outlines
- Depth / LineArt – For more realistic control or stylized outlines
⚠️ ControlNet has a learning curve, but once you get it, it’s god-tier control over image composition.
TL;DR:
- ADetailer = Automatic face fixer — great for portraits, NSFW, and consistency
- ControlNet = Total control over pose, shape, or layout — perfect for character work
Troubleshooting common issues
We’ve recently released a blog that will help you diagnose some of the most common issues you can encounter when generating Ai Images. Look for it here
Wrapping Up (For Now…)
By now, you should have a solid grasp of the core concepts behind AI image generation — from checkpoints and LoRAs to CFG scale, samplers, and even advanced tools like ADetailer and ControlNet.
But this is just the beginning.
There are many more powerful keywords and tools in the world of Stable Diffusion that we didn’t cover here, like:
- Inpainting and outpainting
- Tiling for seamless patterns or textures
- V-Parameter (used in some SDXL merges)
- Refiner models
- Dynamic prompts, wildcards, and prompt interpolation
- And much more…
We’ll cover all of those in Part 2, coming soon!
👉 Until then, the best way to learn is to experiment — or better yet, let us handle the heavy lifting for you.
🧠 Our platform takes care of:
- Model loading
- VAE handling
- Prompt-to-tag conversion
- Automatic emphasis
- Sampler + CFG tuning
- Preloaded LoRAs
- And more…
🎨 Just type what you want, and we’ll help bring it to life.